Optimization Workflow#
The workflow to compress a model can be divided into three categories. They vary in terms of what is required, how time or data intensive the process is, and how much of the model accuracy can be preserved for a given compression factor. This section goes over the workflows, provides recommendations on when to use which ones, and gives an overview of which model formats and coremltools APIs to use for each of the approaches.
Post-training data-free compression#
Characteristics of this workflow:
You just need the model and nothing else (no data or access to training pipeline).
Algorithms in this category work by simply minimizing the error between compressed and uncompressed weights.
This is the fastest workflow and typically takes a few seconds or up to a few minutes for a large model. While accuracy is very model- and task-specific, accuracy will typically drop much faster in this workflow when the amount of compression increases.
A few examples when you may want to use this workflow:
The following two approaches can get a factor of 2x or more compression instantly with minimal loss of accuracy for most models, and decent latency gains depending on the specific model instance:
Palettization to 8 or 6 bits
Linear quantization of weights to 8 bits
In many cases, you may be able to compress more without much degradation. If it works for your model, it is a very quick way to get them up to four times smaller compared to the
float16precision version!4-bit palettization with grouped channel mode (typical group sizes to try: 32, 16, 8)
4-bit weight-only quantization with per block mode (typical block sizes to try: 64, 32, 16)
Since on-device performance metrics (latency, memory footprint, model size) depend solely on the compression configuration used, and not on the workflow used for compression, it is always recommended to start with the data free approach to get a quick estimate of latency and runtime performance. For instance, if you find out that, 70% sparsity gets you to your desired latency goal on your target device, then you can look into data calibration or fine-tuning to get a model with that config and good accuracy.
Post-training calibration data based compression#
Small amount of data required (e.g. 128 training samples).
With data available, the algorithms in this category can compress weights while accounting for the quantization error in the predicted outputs (final or intermediates).
Algorithms used in this class may or may not be gradient based. Depending on that, you may need to provide a loss function in addition to the data.
Typical examples for when this workflow may be appropriate:
Quantizing activations to 8 bits for latency gains on the Neural Engine. This requires data, as it is needed to compute the correct scales/offsets for intermediate activations.
Palettization with 4 bits on large models. In many cases, the accuracy when compared to the data-free method can be improved by using a data-aware version of the k-means algorithm, available via the
cto.torch.palettization.SKMPalettizerAPI.Similarly, both weight quantization to 4 bits or pruning may do better with calibration data based optimizations, which are available via the
cto.torch.layerwise_compressionAPI.
Model fine-tuning based compression#
Performs the best in terms of getting better accuracy for higher compression amounts (4 bits or lower). Accordingly, this is also the most time and data intensive of all the flows.
Even though you will typically start off from a pre-trained model, access to the full training pipeline and the training data is required for fine-tuning.
A few examples when this approach is appropriate:
Palettization to 4 bits with a single lookup table (LUT) or to lower than 4 bits
If activation quantization with calibration data loses accuracy, then quantization-aware training (QAT) is required to regain the loss.
For pruning, this is the most effective workflow, and it is often required to achieve higher levels of sparsity (75% or more) without significant loss of accuracy.
For large models, if the data-free or calibration data based techniques lead to high degradation, then it is recommended to first compress the weights of the torch model, using something like the data-free approach, and then try to regain accuracy by performing parameter-efficient fine-tuning (attaching adapters to the models and fine-tuning those).
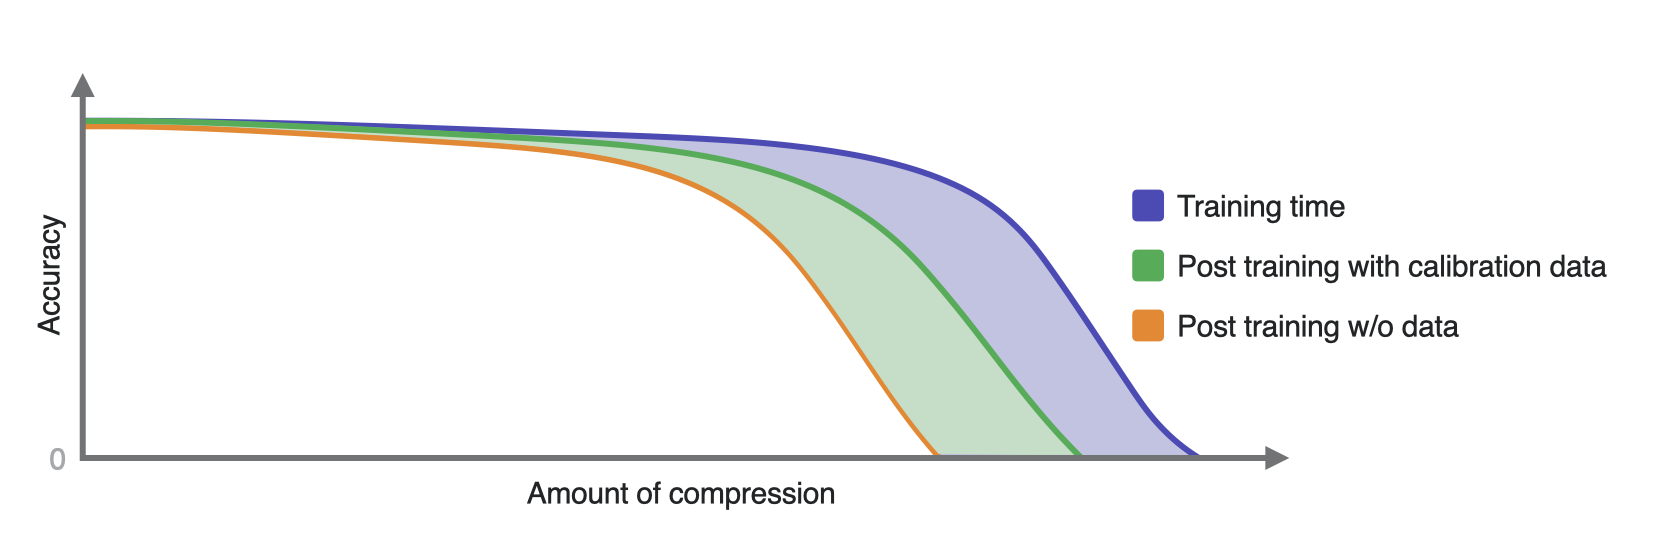
A hypothetical “accuracy-compression amount” trade-off curve to illustrate what you may see on average for different compression workflows.#
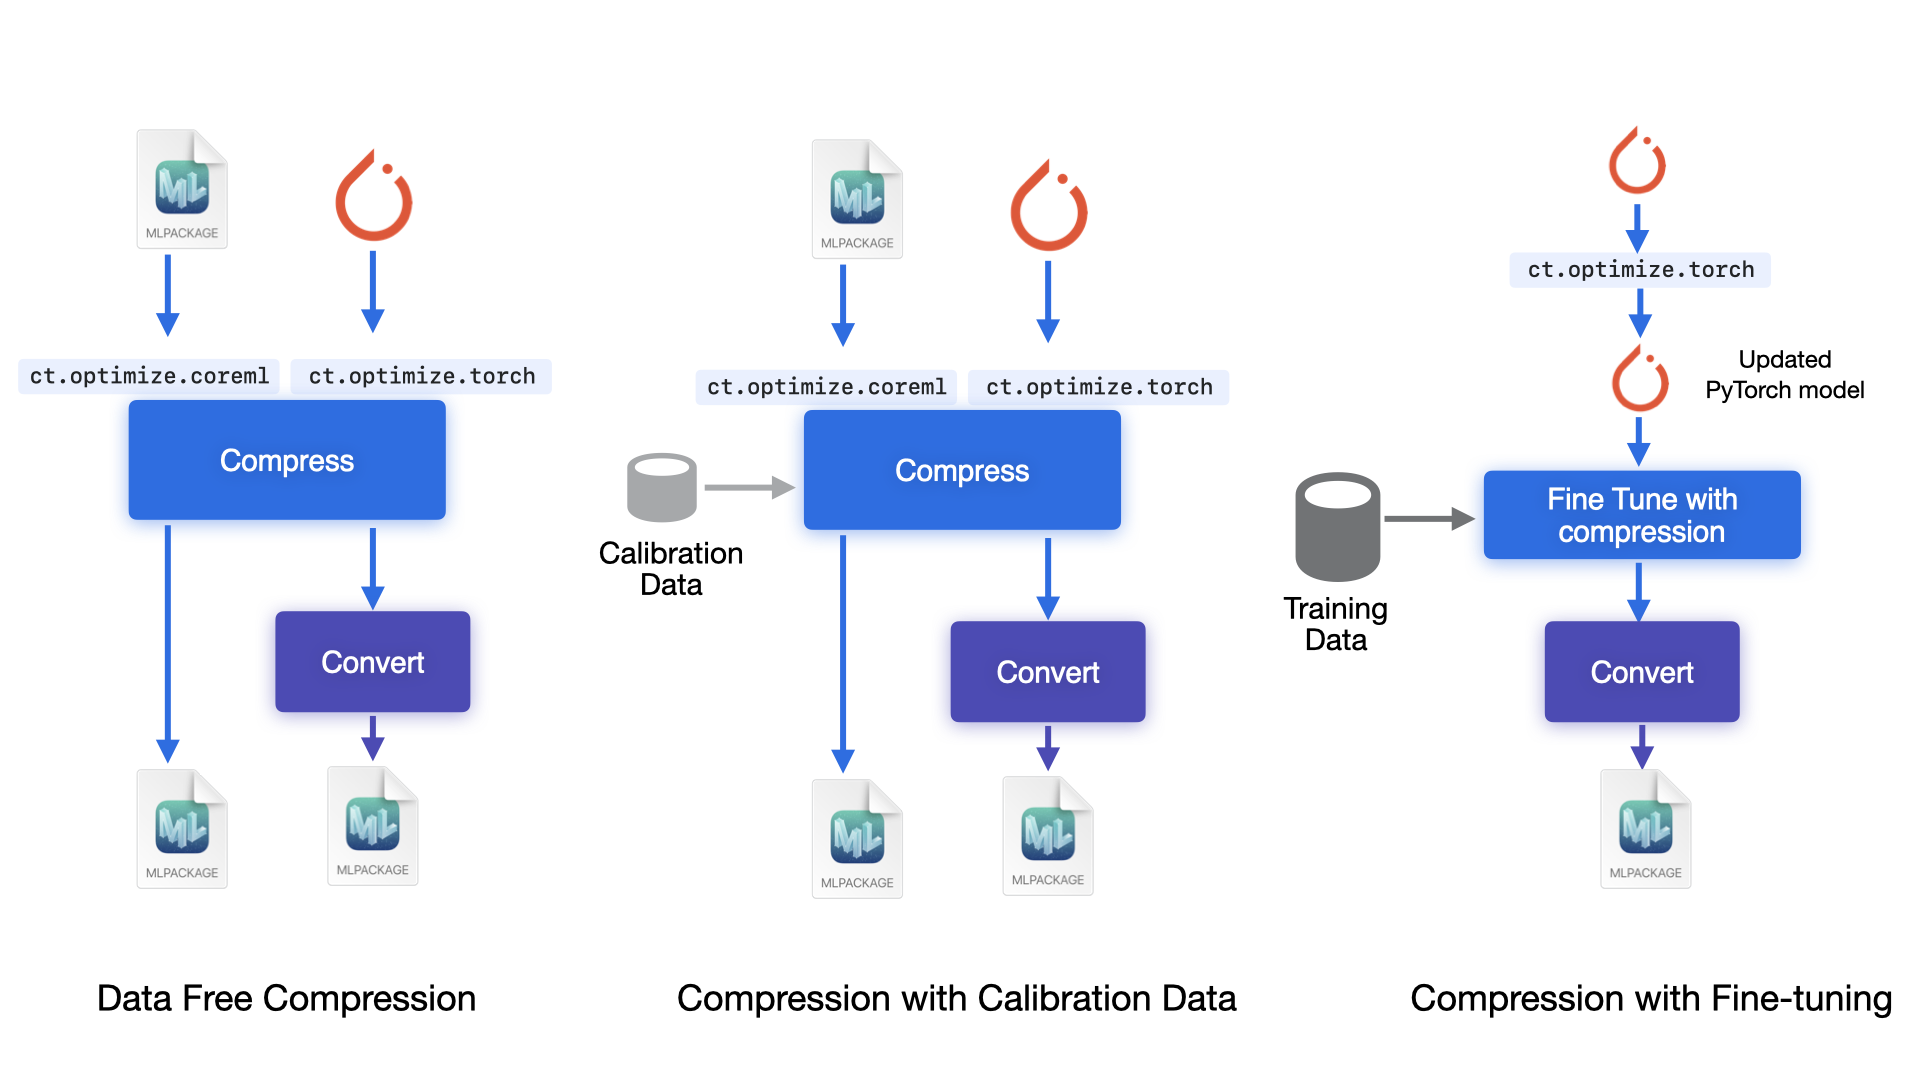
Compression workflows for different input model formats#
APIs for each workflow#
To find a list of APIs, see What’s New. Find a brief overview of a few of the APIs below. Check out the API description page in each of the palettization, quantization, and pruning sections for details.
Data-free compression#
In this case, since all that is needed is the model, you may find it convenient to use the APIs that take
in the mlpackage and return a compressed mlpackage. Methods available under
coremltools.optimize.coreml will do that for you.
PyTorch models are also supported in this flow. If you are experimenting with multiple rounds of compression, such as applying sparsity with data calibration followed by data free palettization, you may find it more convenient to work with those.
Example of applying palettization to an mlpackage model:
import coremltools as ct
import coremltools.optimize as cto

mlmodel = ct.models.MLModel(uncompressed_model_path)
op_config = cto.coreml.OpPalettizerConfig(mode="kmeans",
                                   nbits=4,
                                   granularity="per_grouped_channel",
                                   group_size=16)
model_config = cto.coreml.OptimizationConfig(global_config=op_config)
compressed_mlmodel = cto.coreml.palettize_weights(mlmodel, model_config)
Example of applying palettization to a torch model:
import coremltools as ct
from coremltools.optimize.torch.palettization import PostTrainingPalettizerConfig,\
                                                     PostTrainingPalettizer

config = PostTrainingPalettizerConfig.from_dict({"global_config":
                                                {
                                                "n_bits": 4,
                                                "granularity": "per_grouped_channel",
                                                "group_size": 16
                                                }
                                                })
palettizer = PostTrainingPalettizer(uncompressed_torch_model, config)
palettized_model = palettizer.compress()

traced_palettized_model = torch.jit.trace(palettized_model, example_input)
compressed_mlmodel = ct.convert(traced_palettized_model, inputs=...,
                                minimum_deployment_target=ct.target.iOS18)
With calibration dataset#
This flow is mainly available via the coremltools.optimize.torch APIs, as it may require access to
the loss function and gradient computation.
Example of applying palettization using the sensitive k-means algorithm on a torch model:
from coremltools.optimize.torch.palettization import SKMPalettizerConfig,\
                                                     SKMPalettizer

config = SKMPalettizerConfig.from_dict({"global_config":
                                        {
                                         "n_bits": 4,
                                         "granularity": "per_grouped_channel",
                                         "group_size": 16
                                        }
                                       })
palettizer = SKMPalettizer(uncompressed_torch_model, config)
compressed_torch_model = palettizer.compress(data_loader=..., loss_function=...)
Quantizing activations can be applied either to the torch model or directly to an mlpackage model:
import coremltools as ct
import coremltools.optimize as cto
# The following API is for coremltools==8.0b1
# It will be moved out of "experimental" in later versions of coremltools
from coremltools.optimize.coreml.experimental import OpActivationLinearQuantizerConfig, \
                                                     linear_quantize_activations

mlmodel = ct.models.MLModel(uncompressed_model_path)

# quantize activations to 8 bits (this will give an A8W16 model)
act_quant_op_config = OpActivationLinearQuantizerConfig(mode="linear_symmetric")
act_quant_model_config = cto.coreml.OptimizationConfig(global_config=act_quant_op_config)
mlmodel_compressed_activations = linear_quantize_activations(mlmodel,
                                                             act_quant_model_config,
                                                             sample_data=...)

# quantize weights to 8 bits (this will give an A8W8 model)
weight_quant_op_config = cto.coreml.OpLinearQuantizerConfig(mode="linear_symmetric",
                                                     dtype="int8")
weight_quant_model_config = cto.coreml.OptimizationConfig(weight_quant_op_config)
mlmodel_compressed = cto.coreml.linear_quantize_weights(mlmodel_compressed_activations,
                                                 weight_quant_model_config)
With fine-tuning#
This workflow is available only for torch models, via the coremltools.optimize.torch APIs,
as it involves integration into the torch training code.
This integration can be very easily done by simply modifying the original training code with a few lines of code, primarily
via invocations of the prepare, step and finalize methods.
See examples of fine-tuning with
palettization,
quantization,
and
pruning
on an MNIST model to get an overview of the APIs.